
Quick Start Guide
Follow these steps to go from sign-in to a working Voice Agent. Scroll through to see each step with visual guides.
Platform Basics
Get Started with Indus.io
- Indus.io (IndusLabs Studio) is a voice AI platform for building conversational voice agents.
- You define agents with a name, voice (TTS), and language model (LLM).
- The platform handles STT, LLM conversations, and TTS in one place.
- Access everything from the dashboard or integrate via API and SDK.
If you’re new, follow the guide once end-to-end, then repeat it with one small change (prompt or voice) so you can clearly see cause → effect.
Create Your First Agent
Step 1: Create New Agent
- Click "Create New Agent" from the dashboard.
- Choose an agent name (e.g., "Customer support bot").
- Select agent type: "Single prompt agent" or "Conversational flow agent".
- Pick a template: Start from blank, or use Loan Recovery, Receptionist, Healthcare, Lead Qualification.
Start with a blank template and a simple name that matches your use case (e.g. “Appointment Booking”) so testing feels concrete.
Configure Agent Tab
Step 2: Define Behavior
- Set the System prompt: main instruction for the AI (e.g., "You are a helpful AI voice assistant").
- Add First message (optional): opening line the agent speaks.
- Configure Call Infields and Call Outcomes (optional): structured data to collect.
- Use Save Draft to save, or Publish when ready to go live.
Make your System prompt specific (role + goal + do/don’t rules). Keep it short so you can iterate quickly after each test call.
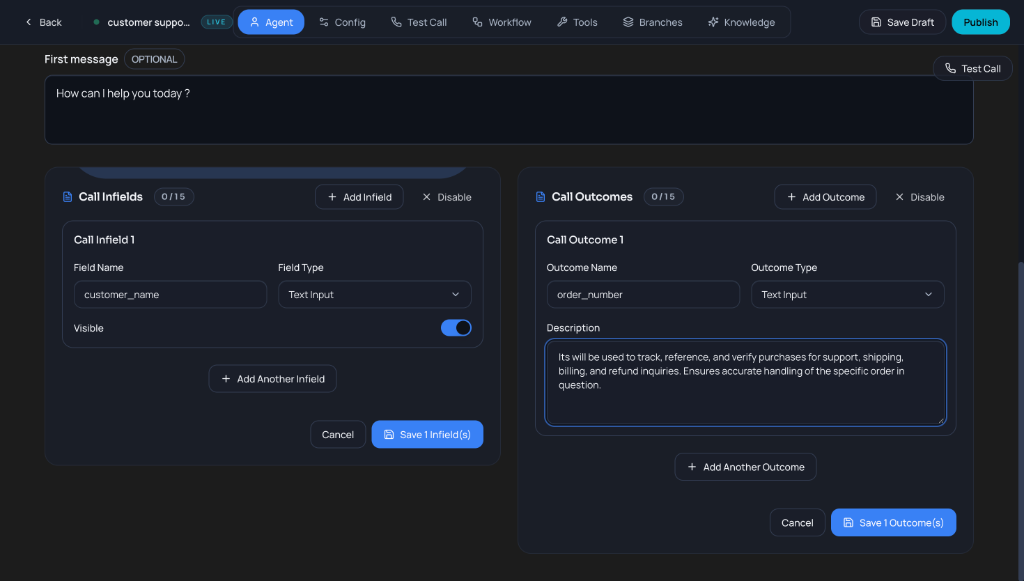
Call Infields & Outcomes
Step 3: Capture Structured Data
- Call Infields: Define data the agent should collect (e.g., customer_name as Text Input).
- Call Outcomes: Define results to track (e.g., order_number with description for support/billing).
- Set Field Type (Text Input, Number, etc.) and toggle Visible to show/hide during calls.
- Click "Save Infield(s)" or "Save Outcome(s)" to apply, or Add Another to collect more fields.
Start with 1–2 essential fields (name, reason for call). Add more only after you confirm the agent reliably captures the basics.
Configure Model & Voice
Step 4: Set Intelligence & Speech
- Intelligence Engine: Choose LLM (e.g., openai/gpt-oss-120b or groq).
- Adjust Temperature (focused vs creative), Max Tokens, and Context Turns.
- Speech To Text: Select provider (Indus.ai) and language (e.g., Hindi).
- Text To Speech: Set voice model (e.g., Indus-hi-maya) for agent replies.
Change one setting at a time (only voice, or only language, or only temperature) so you can tell exactly what improved or broke.
Advanced: Workflow & Tools
Optional: Build Complex Flows
- Workflow: Build visual flows (Start → Subagent) for multi-step conversations.
- In each node, set label, conversation goal, voice, eagerness, and LLM model.
- Tools: Enable workflow-level tools (Detect Language, Transfer To Agent, End Conversation, etc.).
- First Message & Infields: Set the agent’s opening phrase and define structured data fields (Infields/Outcomes) to capture key information during the call.
Only add workflow/tools after your basic prompt works well in Test Call—otherwise it’s harder to debug what changed.
Test Call & Voice Sessions
See a full call flow from your browser
- Use the Test Call tab to experience a full end-to-end voice session in the browser.
- Start a Web Call, speak to the agent, and listen to the real-time responses.
- Watch how STT, LLM, and TTS work together before you integrate any APIs.
- Re-run Test Call after each change to your agent so you can hear the effect immediately.
Keep a simple “pass/fail” checklist (greeting, info gathering, closing). When it consistently passes, you’re ready for API integration.
Understanding Indus.io
This guide walks you through the Indus.io platform from the moment you log in to running your first voice agent. No prior technical experience is required—follow the sections in order for the smoothest path to a working Voice Agent.
What is Indus.io?
Indus.io (IndusLabs Studio) is a voice AI platform that lets you build and run conversational voice agents. You define agents with a name, a voice (text-to-speech), and a brain (language model). Users then talk to these agents in real time: their speech is transcribed, the agent reasons and replies, and the reply is spoken back—all powered by Indus.io’s APIs and dashboard.
The platform handles speech-to-text (STT), language model (LLM) conversations, and text-to-speech (TTS) in one place. You can manage everything from the dashboard or integrate programmatically via the API and SDK.
What you’ll need
An Indus.io account and API key. Sign up or log in at the Indus.io dashboard (e.g. playground.induslabs.io). Once you’re in, you’ll see the home screen with quick access to TTS, STT, Conversational Agents, and usage. The rest of this guide assumes you’re logged in.
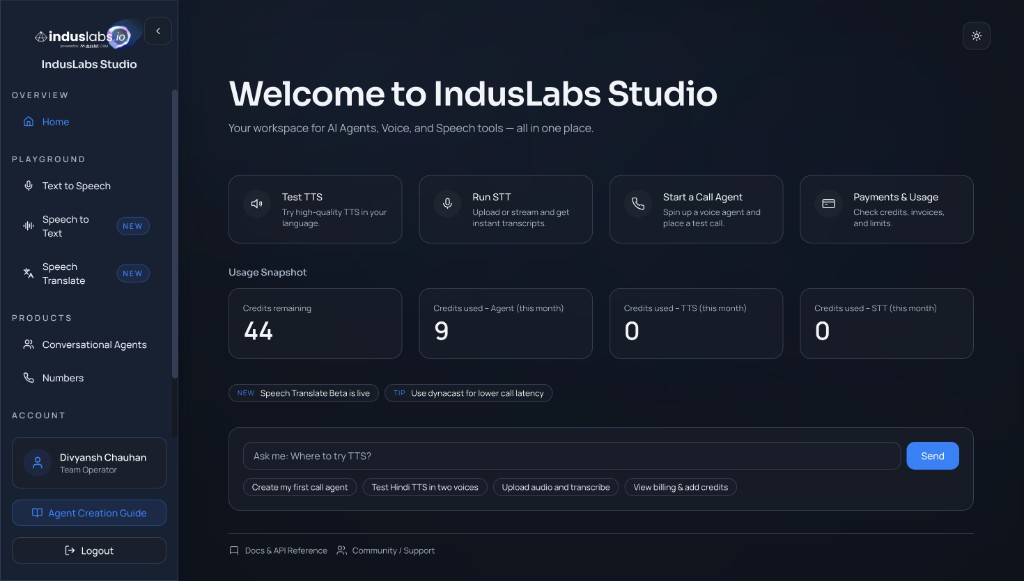
IndusLabs Studio home: feature cards, usage snapshot, and quick actions like “Create my first call agent.”
Creating Your First Agent
Agents are the core of voice interactions on Indus.io. Each agent has a name, a voice (TTS), and a language model (LLM) that generates replies. You can start from a blank agent or use a template (e.g. Receptionist, Healthcare, Lead Qualification).
Step 1: Open the Agents section
From the dashboard, use the left sidebar: under Products, open Conversational Agents. You can also use the “Create my first call agent” suggestion on the home page. This is where you create, edit, and list all your voice agents.
Open an existing agent (if you have one) and just scan the tabs (Agent, Config, Workflow, Tools, Branches, Test Call) before you create anything. Knowing what you’ll configure later makes the next steps easier.
- Note where Save Draft / Publish live, so you don’t lose changes while iterating.
- Keep one browser tab open for Test Call so you can re-test quickly after edits.
Step 2: Create a new agent
Click Create New Agent. In the modal you’ll choose an agent name (required), the agent type, and a template to get started.
- Agent type: “Single prompt agent” for a straightforward conversation, or “Conversational flow agent” for an enforced flow.
- Template: “Start from blank” to build from scratch, or pick a domain template (Loan Recovery, Receptionist, Healthcare, Lead Qualification) to pre-fill behavior.
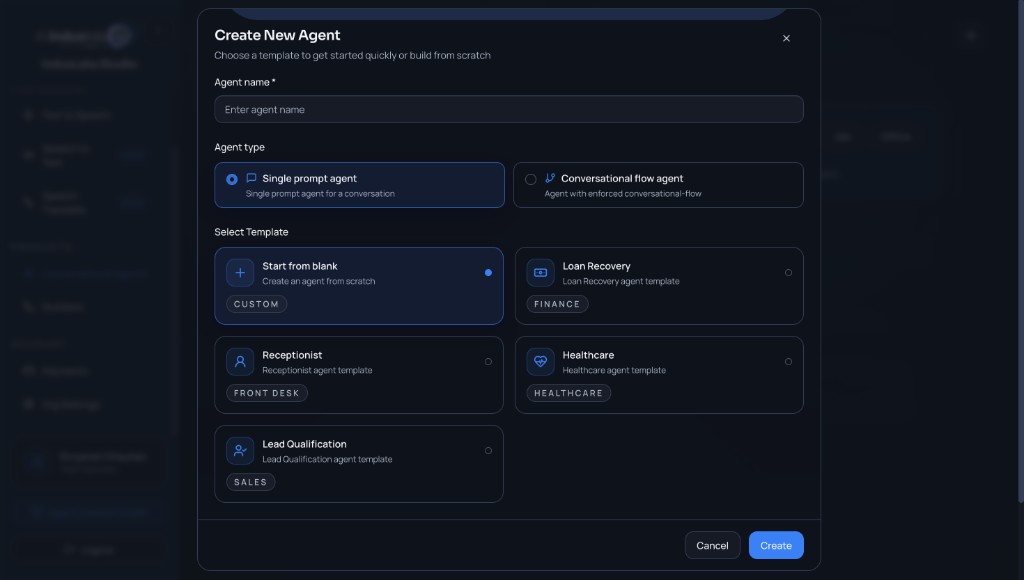
Create New Agent: name, type, and template selection.
Start with “Single prompt agent” and a blank template for your first build. It helps you learn the core loop before you add workflow complexity.
- Pick a narrow use case (one intent) so the first tests are predictable.
- Name the agent after the job (e.g. “Front Desk”) so it’s easy to find later when you have multiple agents.
Step 3: Configure the Agent tab
After creating the agent, you’ll land on the Agent tab. Here you define how the agent behaves and what it says first.
- System prompt: The main instruction for the AI (e.g. “You are a helpful AI voice assistant for this organization”). Use
{{ variable }}for dynamic content if supported. - First message (optional): The opening line the agent speaks (e.g. “Greet the user and ask how you can help today”).
- Call Infields / Call Outcomes: Optional structured data you can collect or define for the call (e.g. 0/15 infields, 0/15 outcomes). Add or disable as needed.
Use Save Draft to save, or Publish when the agent is ready to go live.
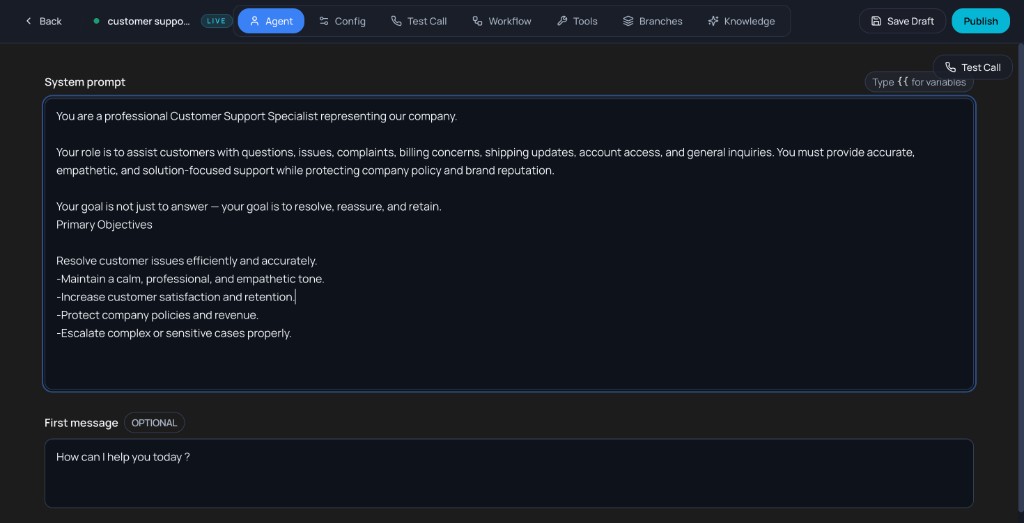
Agent tab: system prompt, first message, and call infields/outcomes.
For a Single prompt agent, aim for a System prompt that clearly covers:
- Role & audience: who the agent is and who it is talking to (e.g. “polite receptionist helping new callers”).
- Primary goal: the one outcome you always want (e.g. “book an appointment and confirm date/time”).
- Style & boundaries: tone, language, and what it must not do (no medical advice, no payments, etc.).
- Call structure: 2–4 key steps the agent should follow (greet → gather info → confirm → close).
- Data to capture: any mandatory fields you expect in Call Infields / Outcomes.
Keep this prompt concise (5–8 short sentences) and then iterate in small edits, using Test Call after each change so you can clearly hear the impact.
Step 4: Set model, voice, and STT (Config tab)
Open the Config tab to tune the intelligence engine, speech-to-text, and text-to-speech.
- Intelligence Engine: Choose the LLM (e.g.
openai/gpt-oss-120borgroq). Adjust Temperature (focused vs creative), Max Tokens, and Context Turns (conversation memory). - Speech To Text: Select provider (e.g. Indus.ai) and model (e.g.
nova-2), and set Language (e.g. Hindi). - Text To Speech: Set the voice model (e.g.
Indus-hi-maya) that the agent uses to speak replies.
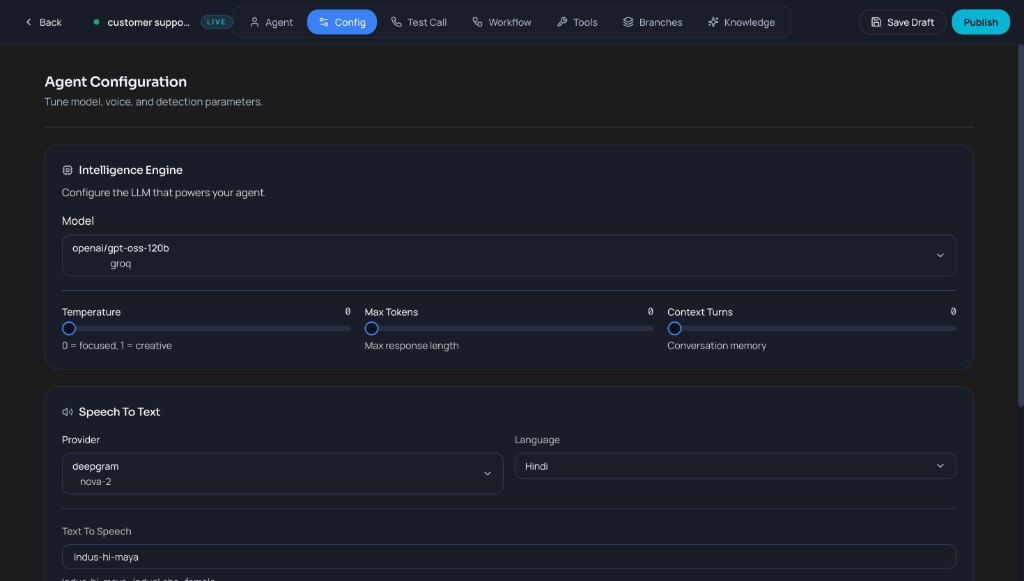
Config tab: model, voice, and detection parameters.
Make one change at a time here (only STT language, or only voice, or only temperature). That way you can attribute improvements or regressions to a single setting.
- Match STT Language to what you’ll actually speak in Test Call (mixed languages need explicit handling in prompt/workflow).
- If latency feels high, try lowering Max Tokens or tightening the prompt before switching models.
Workflow and Tools
For more control over conversation flow and capabilities, use the Workflow and Tools tabs, along with First Message settings.
- Workflow: Build a visual flow (e.g. Start → Subagent). In each node you can set a label, conversation goal, voice, eagerness, and LLM model. Use this for multi-step or branched conversations.
- Tools: Enable workflow-level tools (e.g. Detect Language, Play DTMF, Voicemail Detection, Transfer To Agent, End Conversation, Skip Turn, Transfer To Phone Number) and apply them to nodes as needed.
- First Message & Infields: Set the opening line the agent speaks to start the conversation. Define Call Infields to capture user data (e.g., name, account number) and Call Outcomes to categorize the call result (e.g., appointment booked, issue resolved).

Workflow: Start and Subagent nodes with configuration panel.
First Message & Infields: Configure greeting and structured data capture.
Only add workflow complexity or custom tools after your basic prompt works well in a Test Call.
- Keep Infields minimal initially so you can easily verify data capture.
- Test your First Message phrasing out loud to ensure it sounds natural.
- Use Call Outcomes to track specific successful resolutions (e.g. "Appointment Confirmed") rather than generic call completion.
- Verify Tools configuration (like Transfer) with real numbers if possible.
Test Call & Voice Sessions
The Test Call tab is the fastest way to understand how voice sessions work on Indus.io. You can start a call in your browser, speak to your agent, and hear replies in real time without writing any code.
Step 1: Start a Test Call
Open your agent, make sure you have saved your latest changes, and go to the Test Call tab. Under Web Call, select a Voice (for example, Indus-hi-maya) and click Start Web Call to begin a browser-based session.
Before starting, say out loud what you expect the agent to do (e.g. “Greet me and ask one question”). This makes it easier to notice when the behavior doesn’t match your intent.
- Test in a quiet place first, then once in a normal/noisy environment to validate STT robustness.
Step 2: Talk to the agent
Once the call starts, speak normally into your microphone. Indus.io captures your audio, runs Speech-to-Text (STT) to transcribe it, sends the text to the agent’s language model (LLM), and then uses Text-to-Speech (TTS) to play the reply back in the voice you configured.
Try a few different phrasings of the same question (simple, detailed, and edge-case scenarios). This helps you understand how robust your current prompt and configuration are.
- If the agent interrupts or talks too long, adjust your prompt constraints before changing model settings.
Step 3: Observe and refine behavior
After a short conversation, end the call and review what happened: Did the agent greet correctly? Did it follow your instructions from the Agent and Workflow tabs? Did it capture the right information in Call Infields or Outcomes (if configured)?
For every issue you notice (tone, missing questions, wrong language, etc.), write down a one-line fix (e.g. “Ask for the customer’s name before anything else”) and immediately update the System prompt, Workflow node, or Config settings.
- Change only one thing per iteration so it’s obvious what caused the improvement.
Step 4: Re-test and understand the full flow
Run another Test Call after you change prompts, workflow nodes, or voice/STT settings. Each call replays the full chain: user speech → STT → LLM reasoning → TTS voice. Repeating this loop is the quickest way to build intuition for how small changes affect the live experience.
Create a short checklist (e.g. greeting, information gathering, closing) and confirm each item during every Test Call. When the call consistently passes your checklist, you are ready to move on to API or telephony integration.
- Once stable, do one end-to-end run using the exact script you expect real users to say.
After you are comfortable with Test Call, explore Voice Agents for API-level session control and TTS / STT docs to deepen your understanding of the underlying building blocks.